A regular software update from cybersecurity behemoth CrowdStrike on July 19 caused global digital pandemonium and exposed the vulnerability of interconnected IT networks.
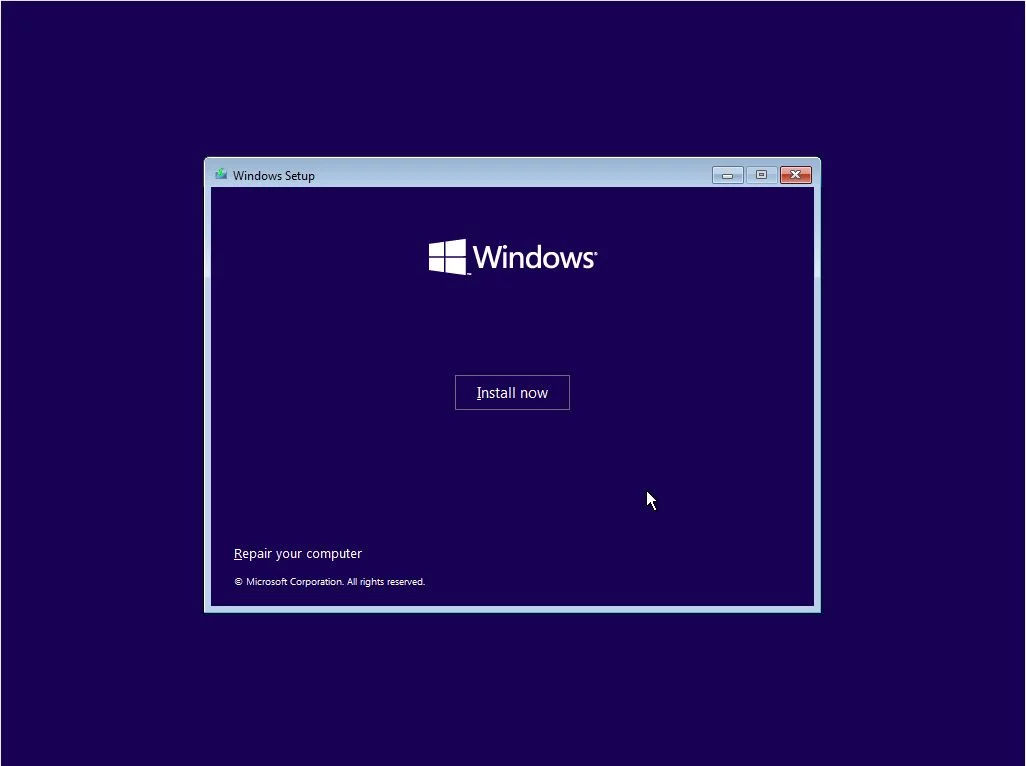
8.5 million devices worldwide experienced the feared “blue screen of death” within hours of Windows-based systems collapsing. The cascade failures paralyzed banks, media outlets, and government institutions, starting in Times Square, New York, when digital billboards went dark, and ending at London’s Heathrow Airport, where flight information boards went blank.
Derivatives trading was suspended even on the Hong Kong stock exchange, and flights from Asia to Australia were suspended. However, notwithstanding the worldwide financial crisis, the second-largest economy in the world maintained its composure. It was business as usual in China. The vital infrastructure of the nation, including banks and aeroplanes, kept running well. There were no delays reported at Beijing Capital International Airport, and there were no trading halts at the Shanghai Stock Exchange.
China’s ability to withstand this global digital crisis demonstrated the effectiveness of its ongoing drive for technological independence. For years, Beijing has systematically replaced foreign technology in vital areas with homegrown equivalents. Unintentionally, this Microsoft outage showed how far China has progressed in lowering its dependency on Western tech firms.
According to a South China Morning Post (SCMP) report, a Chinese government employee stated, “The minimal impact of the Microsoft outage in China has proven that the country has made progress in achieving its goal of “secure and controllable” computing systems.” Internet users in China made jokes on social media about Microsoft surprising them with a day off. One Weibo user joked, referencing Huawei’s proprietary operating system, “Our company just switched to new computers with the HarmonyOS system, so we can’t join in your celebration.”
Contents
What exactly is CrowdStrike, and how did the disruption occur?
The disruption’s magnitude was astounding. CrowdStrike saw its erroneous update affect industries ranging from airlines and finance to healthcare and retail. CrowdStrike controls around 18% of the $8.6 billion global market for “modern” endpoint detection and response software. FedEx, UPS, and McDonald’s were among the big businesses impacted. There were communication problems between the aircraft and ground control; more than 21,000 flight delays were reported worldwide by FlightAware. Employees at major financial institutions like Bank of America, Nomura Holdings, and JPMorgan Chase were unable to access vital systems.
George Kurtz, CEO of CrowdStrike, guaranteed that the issue had been located and a solution implemented. But the recovery procedure turned out to be laborious, necessitating up to fifteen manual reboots of the impacted Windows computers. This laborious procedure highlighted the weakness brought about by depending too much on one leading cybersecurity service.
The event also brought attention to the complicated relationship between Microsoft and CrowdStrike, two of the industry’s most bitter competitors in cybersecurity. The two businesses were inextricably linked even though Microsoft systems running the impacted program were brought down by CrowdStrike’s flawed update due to Windows’ widespread use. Because of this interdependence, the outage had a greater worldwide impact.
China’s tenacity during the CrowdStrike incident
China started working to immunize its vital systems years ago after realizing the threat. For years, Beijing has systematically replaced foreign technology in vital areas with homegrown equivalents. Chinese tech companies have created native equivalents of almost all of the major Western software platforms: Baidu offers mapping and search services similar to Google, Alibaba Cloud serves as an alternative to AWS, and WeChat replaces Facebook and WhatsApp.
There is a price for this desire for independence. China’s reliance on homegrown substitutes may cause it to become isolated from international innovation. The free flow of information is stifled by its tightly restricted internet. Moreover, security concerns frequently make it difficult for Chinese tech enterprises to establish themselves in foreign markets.
The US and its allies should take note of China’s resiliency. It is no longer acceptable to take for granted Western dominance in important technology. China is developing economic advantage and strategic independence as it leads the world in fields like 5G, AI, and quantum computing.
Also read: Alibaba Cloud’s AI-Driven Innovation: A New Era in Olympic Broadcasting for the Paris Games
And, best of all, China is tech-independent even when it comes to business apps. The nation has made quick advances in quantum computing, AI, and chip design. Even so, China is catching up quickly, even if it still depends on foreign suppliers for advanced semiconductor fabrication.
One or more lessons acquired
The incident involving CrowdStrike also emphasizes how urgently important IT systems throughout the world need to be more diverse and resilient. Systemic risk arises from an over-dependence on a single vendor or technology. Organizations should think about multi-cloud solutions, open-source substitutes, and routine offline backups to lessen exposure.
In our connected digital world, policymakers need to consider how to strike a balance between security and openness. These are challenging issues. How can countries protect vital infrastructure and promote innovation and global cooperation simultaneously? What part should the government have in making sure technology is resilient?
The lessons are harsh for the rest of the globe. In this era of hyperconnection, a single software update has the power to completely collapse international trade. Increasing the resilience, diversity, and independence of IT ecosystems is essential for national security as well as economic competitiveness.
The global computing ecosystem will probably fracture more quickly after the great IT catastrophe of 2024. There may be a finish to the age of a truly global internet as countries scramble to protect their cyber sovereignty. The current difficulty lies in striking a balance between the advantages of connectivity and the necessity of security and resilience. China might be ahead of the game.

: A Comprehensive Guide")